这里我们需要去 OpenWeatherMap 申请一个 APIKEY,用于获取天气数据。
开发逻辑
这里我们去提供两个工具即可:
get_current_weather:获取当前的天气信息get_forecast:获取未来几天的天气信息
先通过 ListToolsRequestSchema 列出两个工具,然后通过 CallToolRequestSchema 处理具体的工具执行逻辑,完整代码如下所示:
#!/usr/bin/env node

import { Server } from "@modelcontextprotocol/sdk/server/index.js";
import { StdioServerTransport } from "@modelcontextprotocol/sdk/server/stdio.js";
import {
  CallToolRequestSchema,
  ListToolsRequestSchema,
} from "@modelcontextprotocol/sdk/types.js";

const API_CONFIG = {
  BASE_URL: "https://api.openweathermap.org/data/2.5",
  API_KEY: "xxxxxxx",
};

class WeatherServer {
  private server: Server;

  constructor() {
    this.server = new Server(
      {
        name: "weather-server",
        version: "0.1.0",
      },
      {
        capabilities: {
          tools: {},
        },
      }
    );

    this.setupToolHandlers();
  }

  private setupToolHandlers() {
    // List tools
    this.server.setRequestHandler(ListToolsRequestSchema, async () => ({
      tools: [
        {
          name: "get_current_weather",
          description: "Get the current weather in a specific city",
          inputSchema: {
            type: "object",
            properties: {
              city: {
                type: "string",
                description: "The city to get the weather for",
              },
            },
            required: ["city"],
          },
        },
        {
          name: "get_forecast",
          description: "Get the weather forecast for a specific city",
          inputSchema: {
            type: "object",
            properties: {
              city: {
                type: "string",
                description: "The city to get the forecast for",
              },
              days: {
                type: "number",
                description: "The number of days to get the forecast for",
                default: 5,
              },
            },
            required: ["city", "days"],
          },
        },
      ],
    }));

    // call tool
    this.server.setRequestHandler(CallToolRequestSchema, async (request) => {
      switch (
        request.params.name // switch on the tool name
      ) {
        case "get_current_weather":
          return await this.getCurrentWeather(request.params.arguments);
        case "get_forecast":
          return await this.getForecast(request.params.arguments);
      }
      throw new Error(`Unknown tool: ${request.params.name}`);
    });
  }

  // get current weather
  private async getCurrentWeather(args: any) {
    const { city } = args;
    // api.openweathermap.org/data/2.5/weather?q=London&appid={API key}
    const response = await fetch(
      `${API_CONFIG.BASE_URL}/weather?q=${city}&appid=${API_CONFIG.API_KEY}`
    );
    const data = await response.json();

    // 处理天气数据,转换为更友好的格式
    if (data.cod === 200) {
      const content = {
        location: {
          city: data.name,
          country: data.sys.country,
          coordinates: {
            longitude: data.coord.lon,
            latitude: data.coord.lat,
          },
          timezone: data.timezone,
        },
        current: {
          timestamp: data.dt,
          datetime: this.formatDateTime(data.dt, data.timezone),
          temperature: {
            current: this.kelvinToCelsius(data.main.temp),
            feelsLike: this.kelvinToCelsius(data.main.feels_like),
            min: this.kelvinToCelsius(data.main.temp_min),
            max: this.kelvinToCelsius(data.main.temp_max),
            unit: "°C",
          },
          weather: {
            condition: data.weather[0].main,
            description: data.weather[0].description,
            icon: data.weather[0].icon,
            iconUrl: this.getWeatherIconUrl(data.weather[0].icon),
          },
          wind: {
            speed: data.wind.speed,
            direction: data.wind.deg,
            directionText: this.getWindDirection(data.wind.deg),
            unit: "m/s",
          },
          atmosphere: {
            humidity: data.main.humidity,
            pressure: data.main.pressure,
            visibility: data.visibility,
          },
          sun: {
            sunrise: data.sys.sunrise,
            sunset: data.sys.sunset,
            sunriseFormatted: this.formatDateTime(
              data.sys.sunrise,
              data.timezone
            ),
            sunsetFormatted: this.formatDateTime(
              data.sys.sunset,
              data.timezone
            ),
          },
        },
      };
      return {
        content: [
          {
            type: "text",
            text: JSON.stringify(content, null, 2),
          },
        ],
      };
    } else {
      return {
        content: [
          {
            type: "text",
            text: `无法获取天气数据,错误码:${data.cod},错误信息:${data.message}`,
          },
        ],
      };
    }
  }

  // 将开尔文温度转换为摄氏度
  private kelvinToCelsius(kelvin: number): number {
    return parseFloat((kelvin - 273.15).toFixed(1));
  }

  // 获取天气图标URL
  private getWeatherIconUrl(iconCode: string): string {
    return `https://openweathermap.org/img/wn/${iconCode}@2x.png`;
  }

  // 获取风向描述
  private getWindDirection(degrees: number): string {
    const directions = ["北", "东北", "东", "东南", "南", "西南", "西", "西北"];
    return directions[Math.round(degrees / 45) % 8];
  }

  // 将Unix时间戳转换为可读的日期时间
  private formatDateTime(timestamp: number, timezone: number = 0): string {
    // 考虑时区偏移
    const date = new Date((timestamp + timezone) * 1000);
    return date.toISOString().replace("T", " ").substring(0, 19);
  }

  // get forecast
  private async getForecast(args: any) {
    const { city, days } = args;
    const response = await fetch(
      `${API_CONFIG.BASE_URL}/forecast?q=${city}&appid=${
        API_CONFIG.API_KEY
      }&cnt=${days * 8}`
    );
    const data = await response.json();

    // 处理天气预报数据,转换为更友好的格式
    if (data.cod === "200") {
      const forecastItems = data.list.map((item: any) => {
        return {
          timestamp: item.dt,
          date: new Date(item.dt * 1000).toISOString().split("T")[0],
          time: new Date(item.dt * 1000)
            .toISOString()
            .split("T")[1]
            .substring(0, 5),
          datetime: this.formatDateTime(item.dt, data.city.timezone),
          temperature: {
            current: this.kelvinToCelsius(item.main.temp),
            feelsLike: this.kelvinToCelsius(item.main.feels_like),
            min: this.kelvinToCelsius(item.main.temp_min),
            max: this.kelvinToCelsius(item.main.temp_max),
            unit: "°C",
          },
          weather: {
            condition: item.weather[0].main,
            description: item.weather[0].description,
            icon: item.weather[0].icon,
            iconUrl: this.getWeatherIconUrl(item.weather[0].icon),
          },
          wind: {
            speed: item.wind.speed,
            direction: item.wind.deg,
            directionText: this.getWindDirection(item.wind.deg),
            unit: "m/s",
          },
          atmosphere: {
            humidity: item.main.humidity,
            pressure: item.main.pressure,
          },
          clouds: item.clouds.all,
          probability: item.pop,
        };
      });

      const content = {
        location: {
          city: data.city.name,
          country: data.city.country,
          coordinates: {
            longitude: data.city.coord.lon,
            latitude: data.city.coord.lat,
          },
          timezone: data.city.timezone,
        },
        forecast: forecastItems,
      };
      return {
        content: [
          {
            type: "text",
            text: JSON.stringify(content, null, 2),
          },
        ],
      };
    } else {
      return {
        content: [
          {
            type: "text",
            text: `无法获取天气预报数据,错误码:${data.cod},错误信息:${data.message}`,
          },
        ],
      };
    }
  }

  async start() {
    const transport = new StdioServerTransport();
    await this.server.connect(transport);

    console.log("Weather MCP server started");
  }
}

const server = new WeatherServer();
server.start().catch(console.error);
调试
开发完成后,可以使用 npm run build 命令进行构建,会在将项目构建到文件 build/index.js,这就是我们要执行的 MCP 服务器脚本。
Claude MCP 官方还提供了一个 Inspector 工具,MCP Inspector 是一种用于测试和调试 MCP 服务器的交互式开发人员工具。
直接通过 npx 命令就可以使用,不需要安装:
npx @modelcontextprotocol/inspector <command>
# 或者
npx @modelcontextprotocol/inspector <command> <arg1> <arg2>
如果服务器包来自 NPM,则可以使用下面的方式来启动:
npx -y @modelcontextprotocol/inspector npx <package-name> <args>
# 例如
npx -y @modelcontextprotocol/inspector npx server-postgres postgres://127.0.0.1/testdb
如果是本地构建的包,则可以使用下面的方式来启动:
npx @modelcontextprotocol/inspector node path/to/server/index.js args...
比如我们上面构建的天气服务,则可以使用下面的方式来启动:
npx @modelcontextprotocol/inspector node /Users/cnych/src/weather-server/build/index.js
Inspector 工具启动后,会在 localhost:5173 启动一个 Web 页面,我们就可以在上面测试和调试我们的天气服务了。
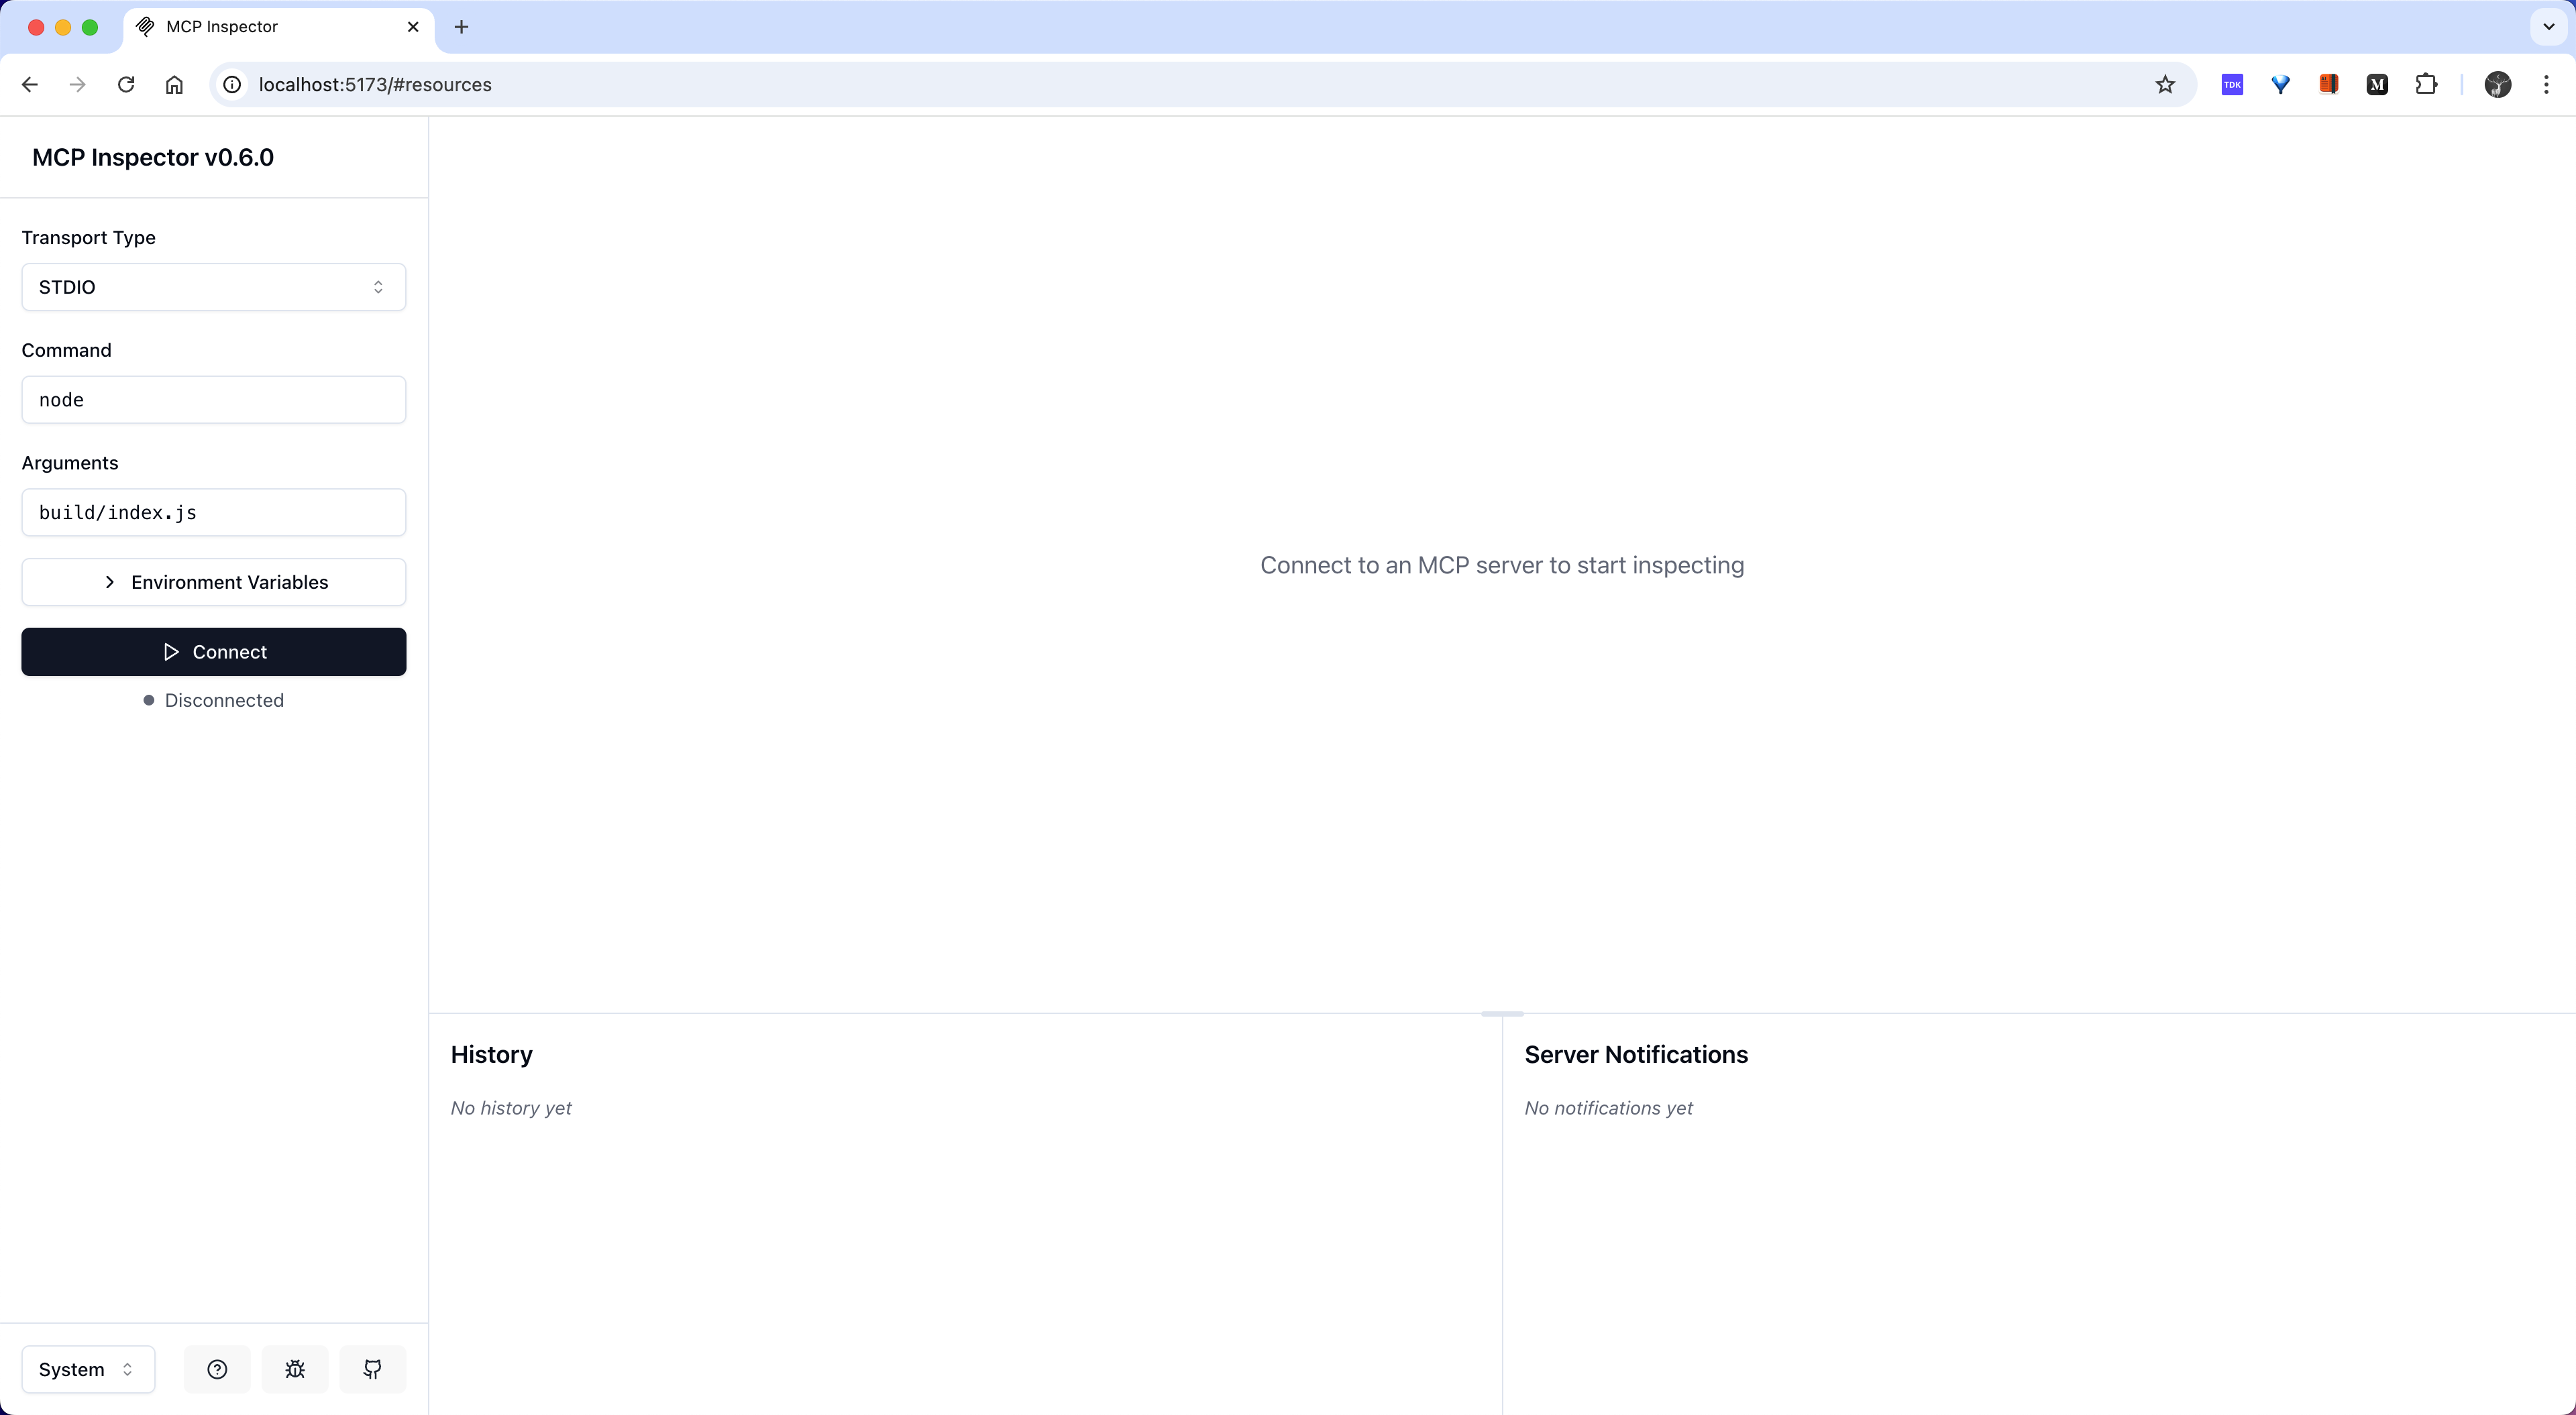
然后点击 Connect 按钮即可连接到天气服务。
连接成功后,我们就可以在右侧主窗口可以看到天气服务的工具了,我们就可以测试和调试了,点击 List Tools 按钮就可以列出天气服务的工具,然后点击具体的某个工具,输入参数后点击 Run Tool 按钮即可调用工具并显示结果。

当然除了 Tools 之外,还可以测试 Resources、Prompts、Sampling 等。
测试
调试没问题后我们可以在 Cursor 中来注册这个 MCP 服务器,可以在项目根目录下面创建一个 .cursor/mcp.json 的文件,内容如下所示:
{
  "mcpServers": {
    "weather": {
      "command": "node",
      "args": [
        "/Users/cnych/src/weather-server/build/index.js"
      ]
    }
  }
}
然后在 Cursor 设置页面的 MCP 标签栏就可以看到这个服务器了:

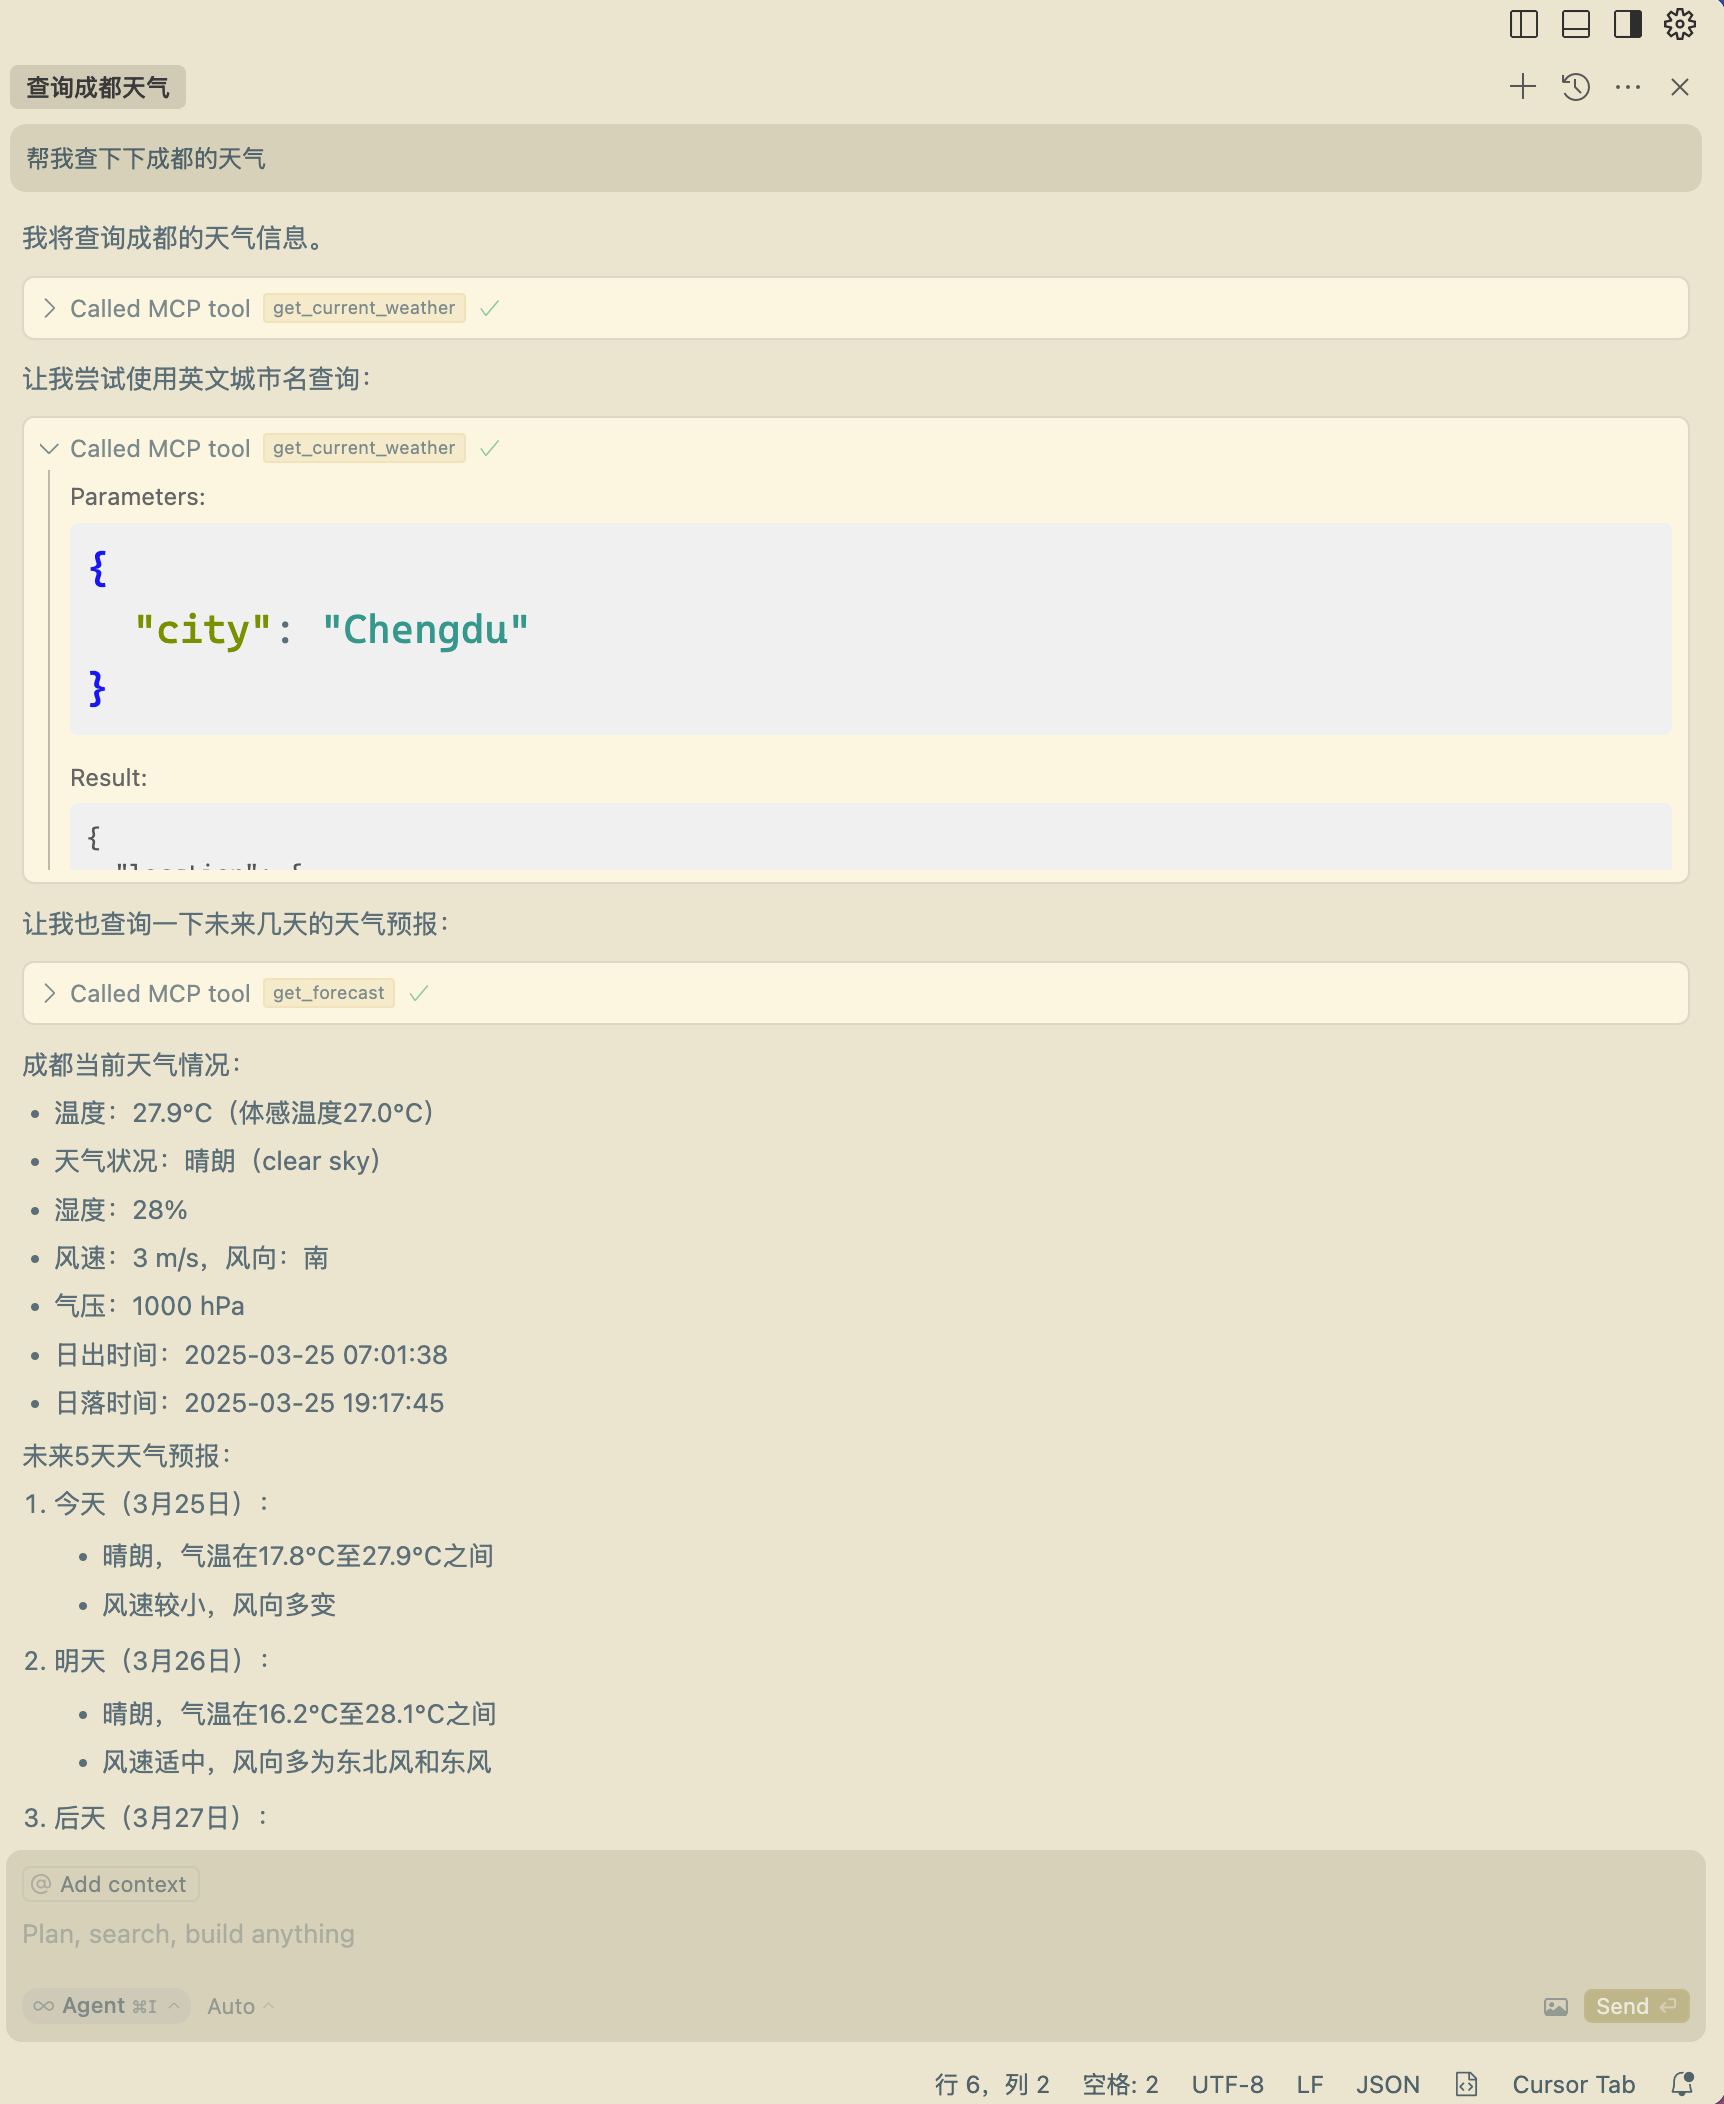
我们可以看到现在就包含 get_current_weather、get_forecast 这两个工具。
然后我们就可以在 Cursor 中来使用这两个工具了: